- C# .NET
- Introduction to .NET Framework
- Applications of .NET, Before .NET
- .NET Advantages, .NET (vs) Java, .NET Framework in-depth
- .NET Framework Architecture, Assemblies and MSIL in-depth
- Run Time Execution Environment, Components of CLR, FCL Architecture
- Getting Started with Visual Studio , Visual Studio IDE
- C# Introduction
- Keywords, I/O Statements, Comments
- Data Types, Variables, Type Casting
- Object class methods, Scope of Variables, Operators, Control Statements
- Enumerations and Arrays
- Main() method in-depth
- Classes and Objects, Creating own classes
- Parameters and Method Overloading
- Properties
- Constructors and Destructors
- Structs
- Partial Classes and Static Classes
- Introduction to Inheritance, Visibility Modifiers and Simple Inheritance
- Hierarchical, Multi-Level and Hybrid Inheritance
- Hiding methods, Method Overriding, Abstract Classes and Methods
- Sealed Classes and Interfaces
- Delegates
- Array Class
- Strings
- DateTime and Random Classes
- Generics
- Collections
- LINQ
- Exceptions
- Debugging, Break points, Immediate window
- Multi Threading
- Multi Threading
- Assemblies
- Assemblies
- Manipulating Drives
- Manipulating Folders
- Manipulating Files and File Streams
- Application Configuration
1) Compiling and Running the application
Compile:
Click on “Build” menu – “Build Solution”. (or) Press Ctrl+Shift+B.
Run:
Click on “Debug” menu – “Start Debugging”. (or) Press F5.
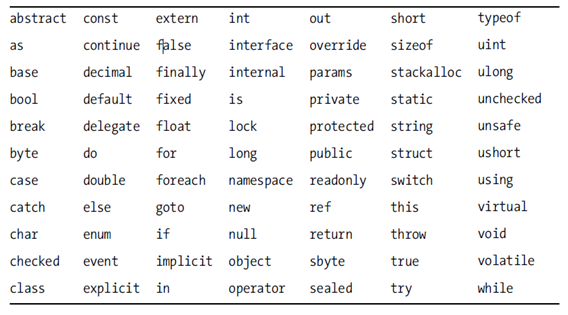
2) Keywords
You can observe the available keywords in C#.

3) Writing output
Write():
Syn 1: System.Console.Write(“any string here”);
Syn 2: System.Console.Write(variable);
The Syntax 1 displays the given string on the console output.
The syntax 2 displays the value of the given variable on the console output.
Note: Here, “System” is the namespace; “Console” is the class; and the “Write” is the method.
WriteLine():
Syn 1: System.Console.WriteLine(“any string here”);
Syn 2: System.Console.WriteLine(variable);
The Syntax 1 and 2 works same as “Write()” method, but moves the cursor automatically to the next line after printing the output on the console window..
Examples:
System.Console.WriteLine(“Welcome”);
System.Console.Write(“C# Programming..”);
System.Console.WriteLine(“Current date and time is “ + DateTime.Now);
4) Reading input
ReadLine():
Syn: variable = System.Console.ReadLine();
The input value entered in the console window, will be assigned to the variable.
Note: This method always the returns the entered value in “string” mode.
Read():
Syn: System.Console.Read();
This statement makes the cursor to wait for pressing “Enter” key on the keyboard. This statement doesn’t takes in input value.
5) Comments
Single Line Comment:
//comment
Multi Line Comment:
/* comment line 1
comment line 2
comment line 3
*/
6) Skip writing the imported namespaces
When you import any namespace, all of the classes of that namespace are implicitly accessible in the code.
For example, when we import “System” namespace, all of the classes under “System” namespace can be accessed without specifying “System.”.
Ex:
When we import like:
using System;
To access “Console” class:
System.Console is not required. Console is enough.
Compile:
Click on “Build” menu – “Build Solution”. (or) Press Ctrl+Shift+B.
Run:
Click on “Debug” menu – “Start Debugging”. (or) Press F5.
2) Keywords
You can observe the available keywords in C#.

3) Writing output
Write():
Syn 1: System.Console.Write(“any string here”);
Syn 2: System.Console.Write(variable);
The Syntax 1 displays the given string on the console output.
The syntax 2 displays the value of the given variable on the console output.
Note: Here, “System” is the namespace; “Console” is the class; and the “Write” is the method.
WriteLine():
Syn 1: System.Console.WriteLine(“any string here”);
Syn 2: System.Console.WriteLine(variable);
The Syntax 1 and 2 works same as “Write()” method, but moves the cursor automatically to the next line after printing the output on the console window..
Examples:
System.Console.WriteLine(“Welcome”);
System.Console.Write(“C# Programming..”);
System.Console.WriteLine(“Current date and time is “ + DateTime.Now);
4) Reading input
ReadLine():
Syn: variable = System.Console.ReadLine();
The input value entered in the console window, will be assigned to the variable.
Note: This method always the returns the entered value in “string” mode.
Read():
Syn: System.Console.Read();
This statement makes the cursor to wait for pressing “Enter” key on the keyboard. This statement doesn’t takes in input value.
5) Comments
Single Line Comment:
//comment
Multi Line Comment:
/* comment line 1
comment line 2
comment line 3
*/
6) Skip writing the imported namespaces
When you import any namespace, all of the classes of that namespace are implicitly accessible in the code.
For example, when we import “System” namespace, all of the classes under “System” namespace can be accessed without specifying “System.”.
Ex:
When we import like:
using System;
To access “Console” class:
System.Console is not required. Console is enough.
using System;
using System.Collections.Generic;
using System.Linq;
using System.Text;
/*An application, that reads your name
and age and displays them.*/
namespace InputAndComments
{
class Program
{
static void Main(string[] args)
{
//declare variables
string name;
int age;
//read name of the person
Console.WriteLine("Enter your name:");
name = Console.ReadLine();
//read age
Console.WriteLine("Enter your age:");
age = Convert.ToInt32(Console.ReadLine());
Console.WriteLine(name + " is about " + age + " years old.");
Console.Read();
}
}
}