- C# .NET
- Introduction to .NET Framework
- Applications of .NET, Before .NET
- .NET Advantages, .NET (vs) Java, .NET Framework in-depth
- .NET Framework Architecture, Assemblies and MSIL in-depth
- Run Time Execution Environment, Components of CLR, FCL Architecture
- Getting Started with Visual Studio , Visual Studio IDE
- C# Introduction
- Keywords, I/O Statements, Comments
- Data Types, Variables, Type Casting
- Object class methods, Scope of Variables, Operators, Control Statements
- Enumerations and Arrays
- Main() method in-depth
- Classes and Objects, Creating own classes
- Parameters and Method Overloading
- Properties
- Constructors and Destructors
- Structs
- Partial Classes and Static Classes
- Introduction to Inheritance, Visibility Modifiers and Simple Inheritance
- Hierarchical, Multi-Level and Hybrid Inheritance
- Hiding methods, Method Overriding, Abstract Classes and Methods
- Sealed Classes and Interfaces
- Delegates
- Array Class
- Strings
- DateTime and Random Classes
- Generics
- Collections
- LINQ
- Exceptions
- Debugging, Break points, Immediate window
- Multi Threading
- Multi Threading
- Assemblies
- Assemblies
- Manipulating Drives
- Manipulating Folders
- Manipulating Files and File Streams
- Application Configuration
Opening Visual Studio
I) Opening Visual Studio
1. Click on “Start” – “Programs” – “Microsoft Visual Studio ” – “Microsoft Visual Studio ”.
2. The following screen will be opened.
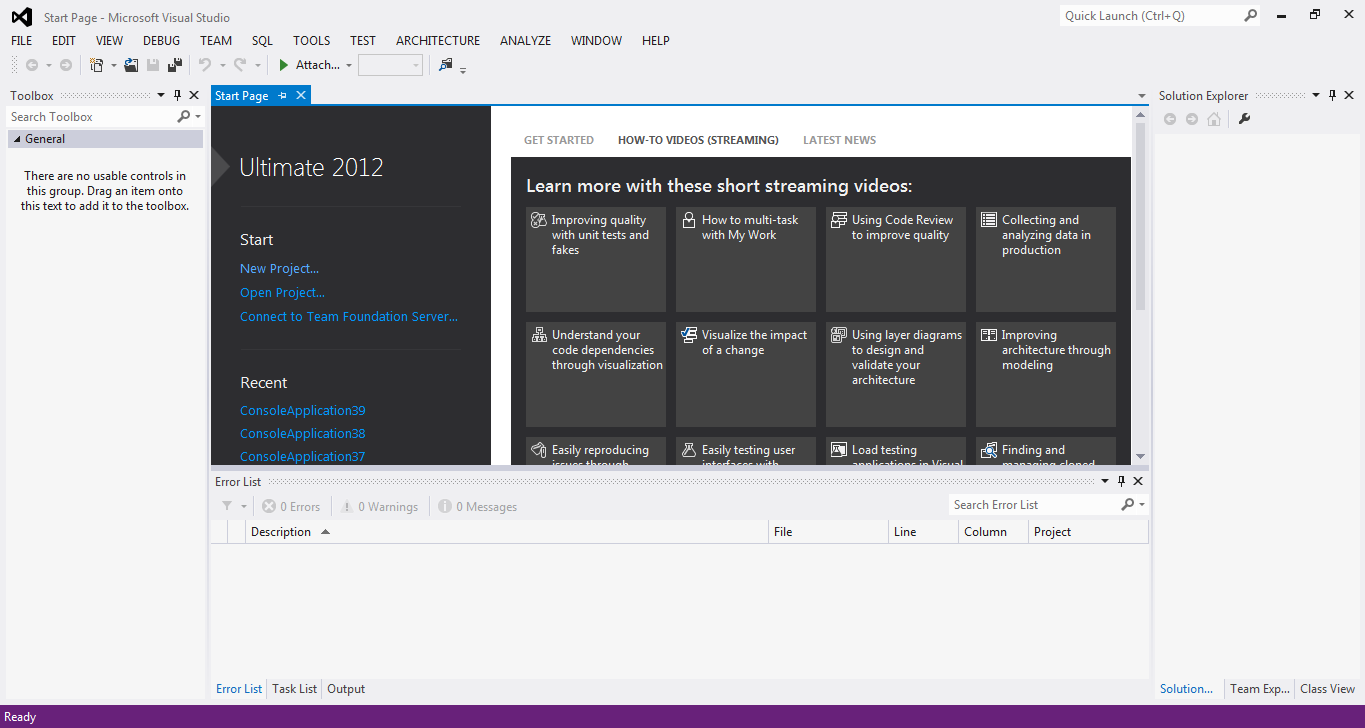
3. Initially, the “Visual Studio ” will be opened along with “Start Page”.
4. The start page is nothing but the welcome page, which contains
• Logo: A logo of “Microsoft Visual Studio 2012” on the top of the start page.
• Recent Projects: List of most recently opened projects. If you click on any one, the project will be opened immediately.
• Getting started: Headlines of visual studio help for .NET beginners. If you click on any one head line, online help will be opened (if Internet connection is available).
• Visual Studio Headlines: The headlines about the latest releases of .NET and Visual Studio versions, updates, beta versions, service packs etc. If you click on any one head line, online help will be opened (if Internet connection is available).
• MSDN - Visual Studio: Most recent headlines of visual studio help from MSDN (Microsoft Developer Network). If you click on any one head line, online help will be opened (if Internet connection is available).
II) The Visual Studio Basics
To start programming with Visual Studio, you should know some common terminology that is used most frequently in Visual Studio.
Project: An application developed in Visual Studio. That may be of different types such as Console application, Windows application, Windows Service, Web site etc.
Solution: Collection of one or more projects. Initially, in a solution, one project will be placed. Later, you can add other projects to it.
Build: Compilation of entire .NET Project.
Class: A collection of data members and methods (member functions).
Ex:
class class1
{
int mydatamember;
private void mymethod()
{
}
}
Namespace: It’s nothing but a collection of classes. It may also contain sub namespaces. A project may require implementing at least one or more classes. In .NET, all of the classes related one application should be defined with a user defined namespace.
Ex:
namespace MyApplication
{
class class1
{
}
class class2
{
}
}
III) Creating a new project
To create a new project in Visual Studio, follow the steps given below.
Open Microsoft Visual Studio .
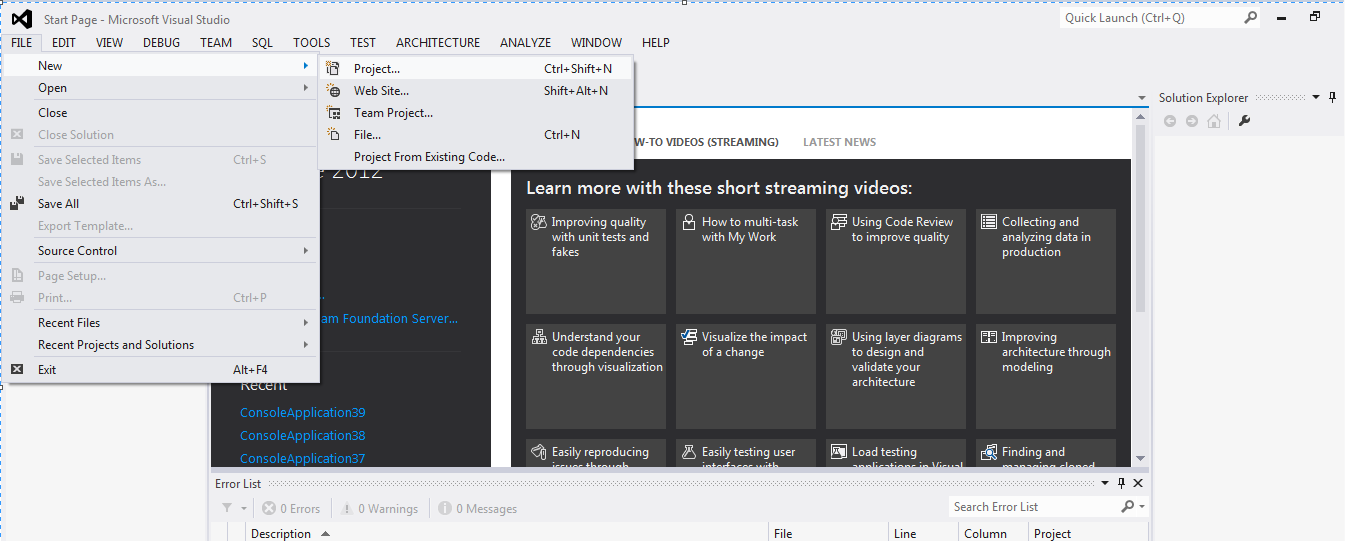
Click on “File” – “New” – “Project”.
In the “New Project” dialog box, the left side panel displays the list of .NET languages like
Visual C#
Visual Basic
Visual C++
etc.
The right side panel displays the list of project templates like
Windows Forms Applications
Class Library
ASP.NET Web Application
ASP.NET Web Service Application
WPF Application
WPF Browser Application
Console Application
WCF Service Application
Windows Forms Control Library
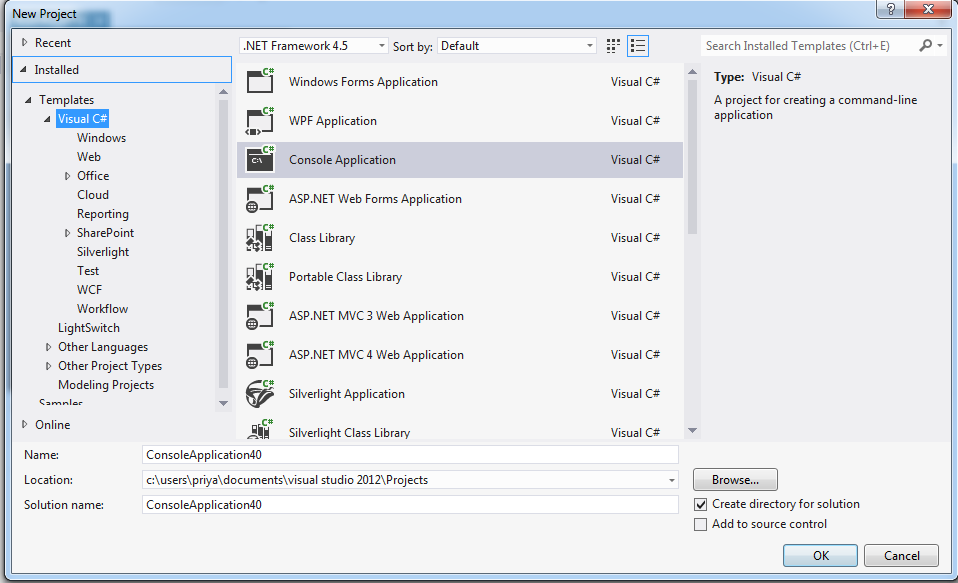 Select the appropriate language and required project template. For example select “Visual C#” and “Windows Forms Application”.
Provide the following details:
Name: Specifies the name of the project.
Ex: WindowsFormsApplication1.
Location: Specifies the path, in which the project is to be stored.
Solution Name: The actual name of the solution. (By default the solution will be created with one project, later you can add other projects to this solution if needed).
Click on “OK” to confirm. Then the new project will be created.
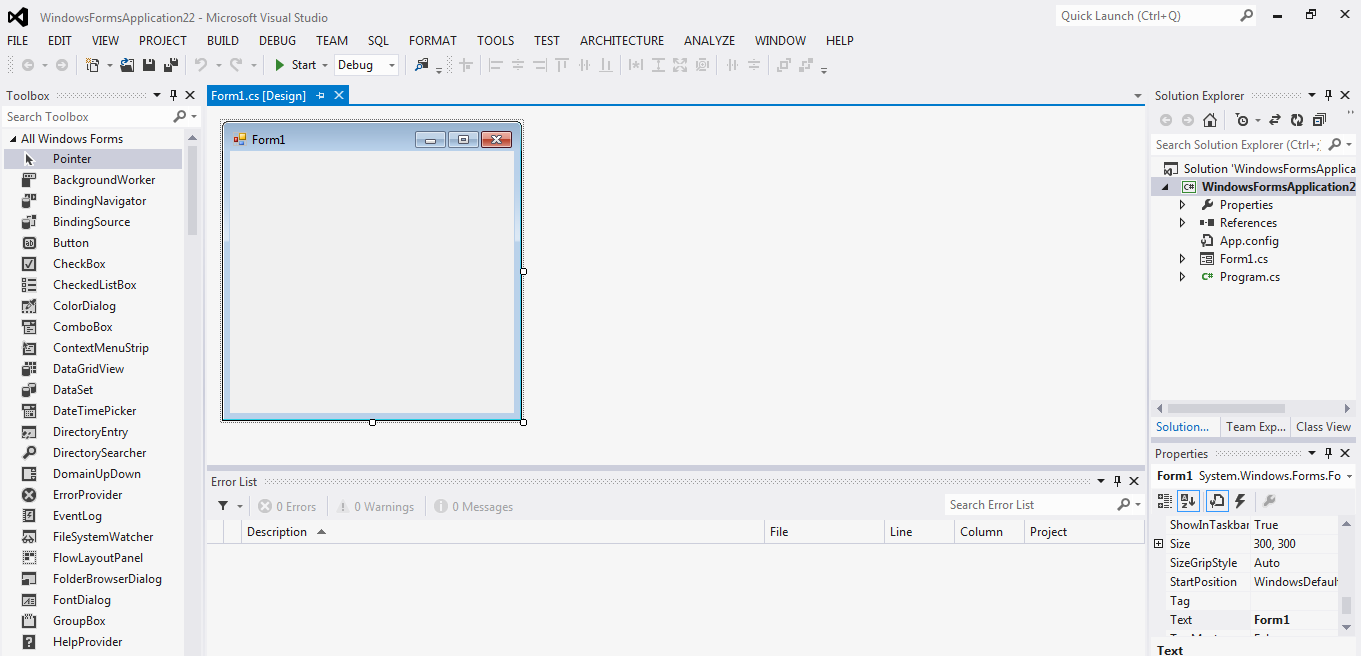 In the above screen, you can see an empty form created automatically, named as “Form1”.
IV) Project Directory Structure
When we create a new project, some directory structure will be created automatically by following the below specified rules.
Each solution will be created as a folder.
Each project will be created as a folder, and placed in the solution folder.
All the files related to the project, will be placed in the project folder.
The information about the solution members will be saved in a file called “Solution” file and it will be placed in the solution folder. When we double click on it, that solution will be opened in Visual Studio. The file extension of the solution file is “.sln”.
In the same way, the information about the project members will be saved in the “Project” file and it will be placed in the project folder. When we double click on it, that project will be opened in Visual Studio.
You can observe the project directory structure according to our previous example.
Note: First, recollect the project name, project location and solution name from previous example.
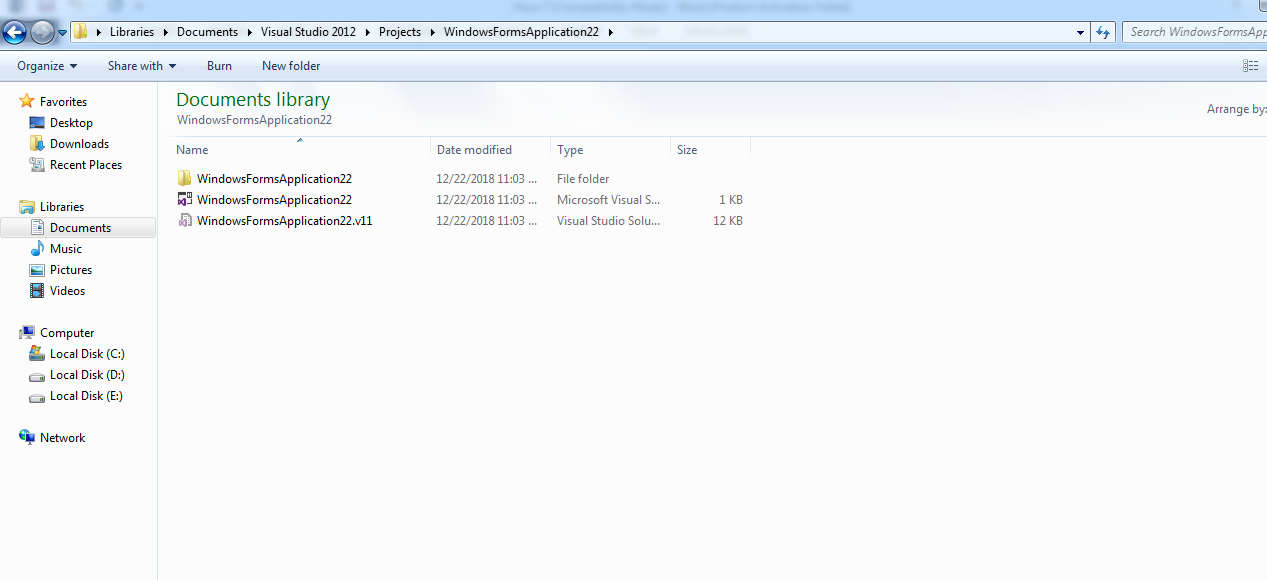
Project Folder:
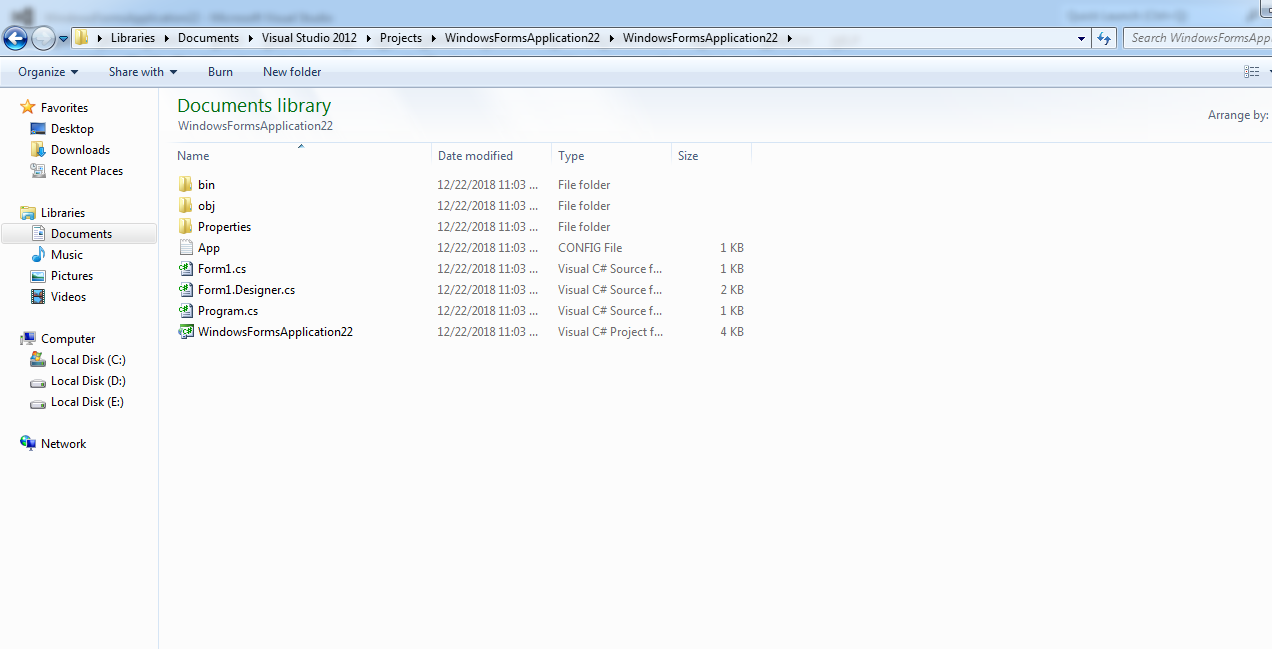 bin: This folder contains the “EXE” file after compiling the project.
obj: This folder contains the temporary files of the project, while compilation.
Properties: This folder contains necessary files that contain information about the settings and resources related to the project.
WindowsFormsApplication1 (Project File): This file contains the information about all the files related to the project; When you double click on it, the project will be opened in Visual Studio.
Form1.cs: This file contains the executable code of “Form1”.
Form1.Designer.cs: This file contains the code related to the design of Form1.
Program.cs: This file contains the code of “Program” class with Main() method.
1. Click on “Start” – “Programs” – “Microsoft Visual Studio ” – “Microsoft Visual Studio ”.
2. The following screen will be opened.
3. Initially, the “Visual Studio ” will be opened along with “Start Page”.
4. The start page is nothing but the welcome page, which contains
• Logo: A logo of “Microsoft Visual Studio 2012” on the top of the start page.
• Recent Projects: List of most recently opened projects. If you click on any one, the project will be opened immediately.
• Getting started: Headlines of visual studio help for .NET beginners. If you click on any one head line, online help will be opened (if Internet connection is available).
• Visual Studio Headlines: The headlines about the latest releases of .NET and Visual Studio versions, updates, beta versions, service packs etc. If you click on any one head line, online help will be opened (if Internet connection is available).
• MSDN - Visual Studio: Most recent headlines of visual studio help from MSDN (Microsoft Developer Network). If you click on any one head line, online help will be opened (if Internet connection is available).
II) The Visual Studio Basics
To start programming with Visual Studio, you should know some common terminology that is used most frequently in Visual Studio.
Project: An application developed in Visual Studio. That may be of different types such as Console application, Windows application, Windows Service, Web site etc.
Solution: Collection of one or more projects. Initially, in a solution, one project will be placed. Later, you can add other projects to it.
Build: Compilation of entire .NET Project.
Class: A collection of data members and methods (member functions).
Ex:
class class1
{
int mydatamember;
private void mymethod()
{
}
}
Namespace: It’s nothing but a collection of classes. It may also contain sub namespaces. A project may require implementing at least one or more classes. In .NET, all of the classes related one application should be defined with a user defined namespace.
Ex:
namespace MyApplication
{
class class1
{
}
class class2
{
}
}
III) Creating a new project
To create a new project in Visual Studio, follow the steps given below.
Open Microsoft Visual Studio .
Click on “File” – “New” – “Project”.
In the “New Project” dialog box, the left side panel displays the list of .NET languages like
Visual C#
Visual Basic
Visual C++
etc.
The right side panel displays the list of project templates like
Windows Forms Applications
Class Library
ASP.NET Web Application
ASP.NET Web Service Application
WPF Application
WPF Browser Application
Console Application
WCF Service Application
Windows Forms Control Library
Select the appropriate language and required project template. For example select “Visual C#” and “Windows Forms Application”. Provide the following details:
Name: Specifies the name of the project.
Ex: WindowsFormsApplication1.
Location: Specifies the path, in which the project is to be stored.
Solution Name: The actual name of the solution. (By default the solution will be created with one project, later you can add other projects to this solution if needed).
Click on “OK” to confirm. Then the new project will be created.
In the above screen, you can see an empty form created automatically, named as “Form1”.IV) Project Directory Structure
When we create a new project, some directory structure will be created automatically by following the below specified rules.
Each solution will be created as a folder.
Each project will be created as a folder, and placed in the solution folder.
All the files related to the project, will be placed in the project folder.
The information about the solution members will be saved in a file called “Solution” file and it will be placed in the solution folder. When we double click on it, that solution will be opened in Visual Studio. The file extension of the solution file is “.sln”.
In the same way, the information about the project members will be saved in the “Project” file and it will be placed in the project folder. When we double click on it, that project will be opened in Visual Studio.
You can observe the project directory structure according to our previous example.
Note: First, recollect the project name, project location and solution name from previous example.
Project Folder:
bin: This folder contains the “EXE” file after compiling the project. obj: This folder contains the temporary files of the project, while compilation.
Properties: This folder contains necessary files that contain information about the settings and resources related to the project.
WindowsFormsApplication1 (Project File): This file contains the information about all the files related to the project; When you double click on it, the project will be opened in Visual Studio.
Form1.cs: This file contains the executable code of “Form1”.
Form1.Designer.cs: This file contains the code related to the design of Form1.
Program.cs: This file contains the code of “Program” class with Main() method.
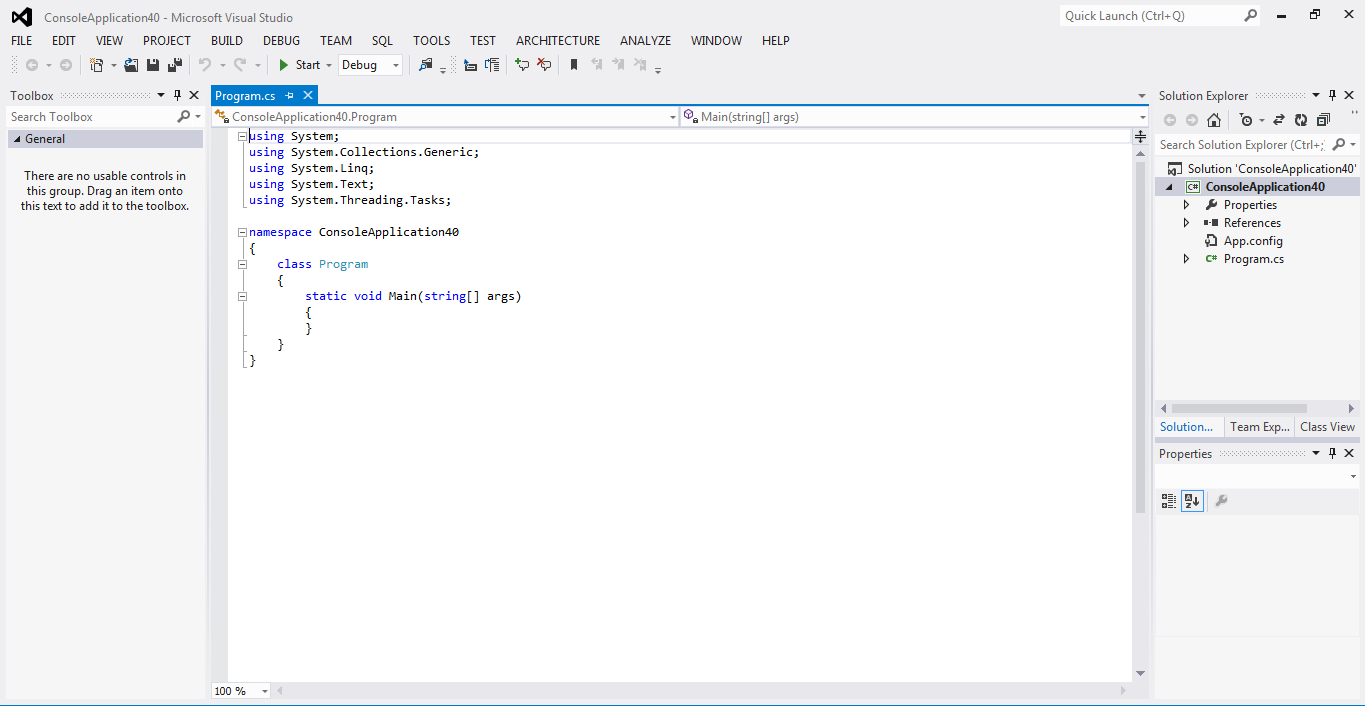
Components of Visual Studio IDE
In this section, we make a closer look to the IDE offered by Visual Studio.
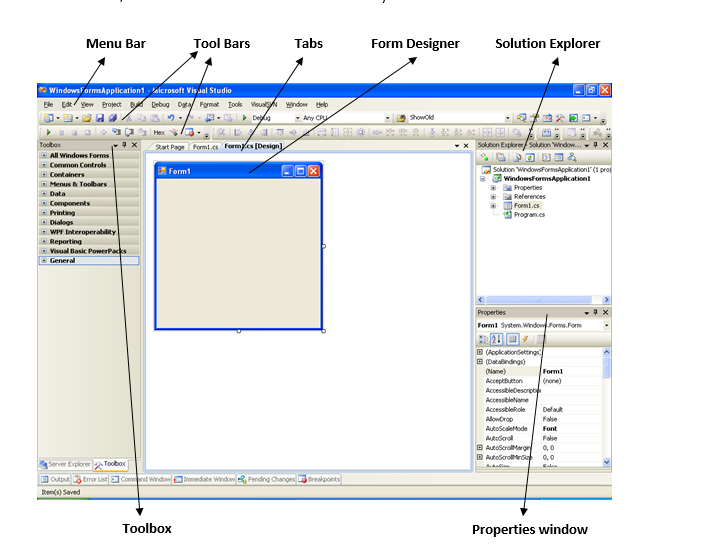
1) Menu Bar: This bar contains the available menus in Visual Studio like “File”, “Edit”, “View” and “Project” etc.
2) Tool Bars: There are several toolbars in Visual Studio, which contain frequently used options in Visual Studio.
3) Tabs: Displays tabs; just click to open required tab.
4) Form designer: Used to view and edit the visual design of the form.
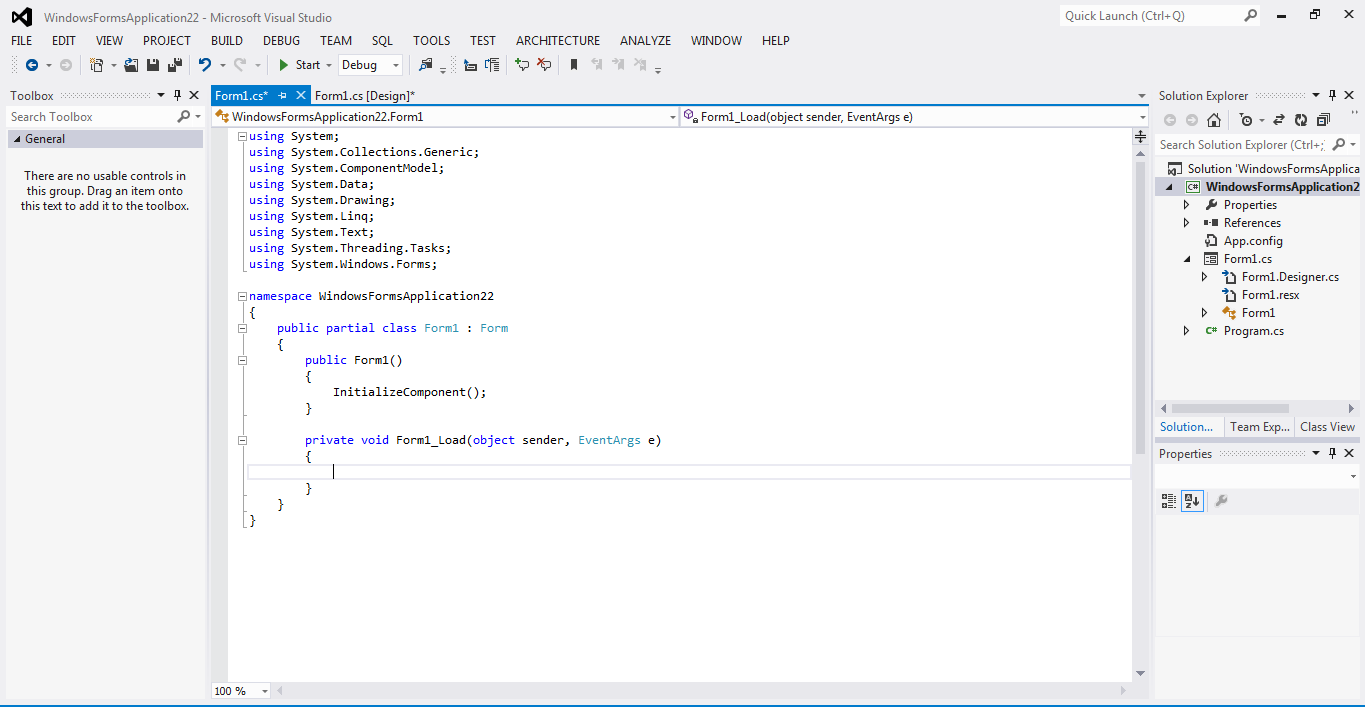
5) Code Window: This is where you write actual programming of your application. You can switch to this view, by right click on the “form designer” and choosing “View Code” (or) by pressing F7 key on the keyboard.
6) Solution Explorer: Explores the information about the solution and its members.
7) Properties: Displays the available properties and values for the selected solution, project, form or control; and also allows to change the property values.
8) Other: In addition to the above specified IDE components, some other components are also available docked at the bottom area of Visual Studio window like “Output”, “Error List”, “Command window”, “Immediate window”, “Breakpoints”. We discuss about these components whenever required, in upcoming chapters later.
V) Creating Console Applications
The console applications are the project types, recommended for the .NET programming beginners, where you can learn the language features better.
In Microsoft Visual Studio 2012, click on “File” – “New” – “Project”.
Select the language as “Visual C#” and select the project template as “Console Application”.
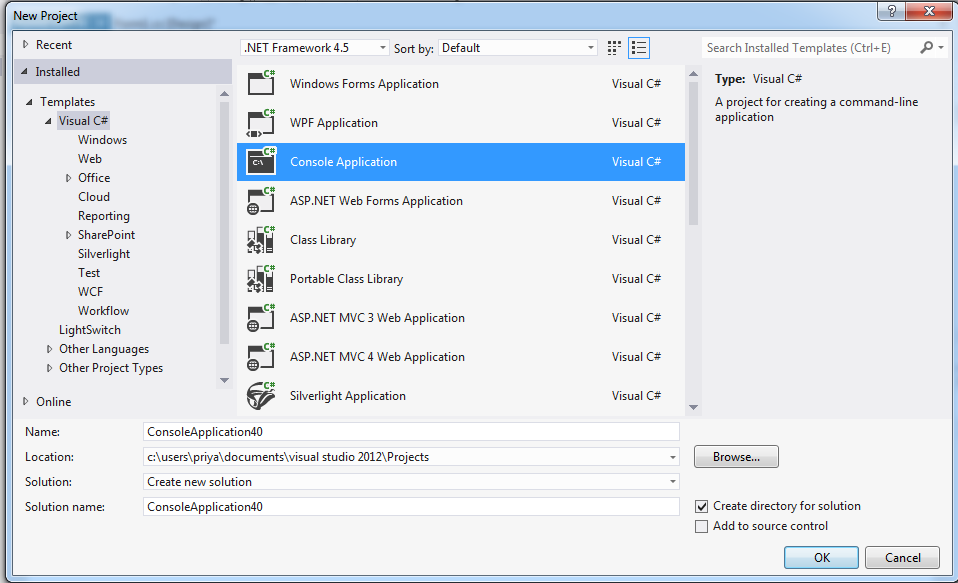
Then enter the project name and location (with your choice) and click on OK.
1) Menu Bar: This bar contains the available menus in Visual Studio like “File”, “Edit”, “View” and “Project” etc.
2) Tool Bars: There are several toolbars in Visual Studio, which contain frequently used options in Visual Studio.
3) Tabs: Displays tabs; just click to open required tab.
4) Form designer: Used to view and edit the visual design of the form.
5) Code Window: This is where you write actual programming of your application. You can switch to this view, by right click on the “form designer” and choosing “View Code” (or) by pressing F7 key on the keyboard.
6) Solution Explorer: Explores the information about the solution and its members.
7) Properties: Displays the available properties and values for the selected solution, project, form or control; and also allows to change the property values.
8) Other: In addition to the above specified IDE components, some other components are also available docked at the bottom area of Visual Studio window like “Output”, “Error List”, “Command window”, “Immediate window”, “Breakpoints”. We discuss about these components whenever required, in upcoming chapters later.
V) Creating Console Applications
The console applications are the project types, recommended for the .NET programming beginners, where you can learn the language features better.
In Microsoft Visual Studio 2012, click on “File” – “New” – “Project”.
Select the language as “Visual C#” and select the project template as “Console Application”.
Then enter the project name and location (with your choice) and click on OK.