- C# .NET
- Introduction to .NET Framework
- Applications of .NET, Before .NET
- .NET Advantages, .NET (vs) Java, .NET Framework in-depth
- .NET Framework Architecture, Assemblies and MSIL in-depth
- Run Time Execution Environment, Components of CLR, FCL Architecture
- Getting Started with Visual Studio , Visual Studio IDE
- C# Introduction
- Keywords, I/O Statements, Comments
- Data Types, Variables, Type Casting
- Object class methods, Scope of Variables, Operators, Control Statements
- Enumerations and Arrays
- Main() method in-depth
- Classes and Objects, Creating own classes
- Parameters and Method Overloading
- Properties
- Constructors and Destructors
- Structs
- Partial Classes and Static Classes
- Introduction to Inheritance, Visibility Modifiers and Simple Inheritance
- Hierarchical, Multi-Level and Hybrid Inheritance
- Hiding methods, Method Overriding, Abstract Classes and Methods
- Sealed Classes and Interfaces
- Delegates
- Array Class
- Strings
- DateTime and Random Classes
- Generics
- Collections
- LINQ
- Exceptions
- Debugging, Break points, Immediate window
- Multi Threading
- Multi Threading
- Assemblies
- Assemblies
- Manipulating Drives
- Manipulating Folders
- Manipulating Files and File Streams
- Application Configuration
Sometimes, you may require running the .NET applications from Command window (MS-DOS window).
At that time, follow the below steps:
1) Click on “Start” – “Run”.
2) Type “cmd”.
3) Press Enter.
4) A MS-DOS prompt window will be opened.
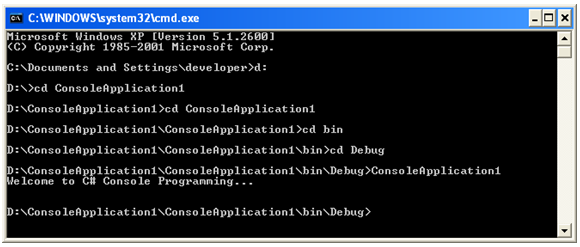
 5) Now, locate the “bin” folder of the required application, by using the following commands. For example, let us imagine that there is a project named “ConsoleApplication1” in “D:” drive.
 6) Now, you got the output as
Welcome to C# Console Programming…
At that time, follow the below steps:
1) Click on “Start” – “Run”.
2) Type “cmd”.
3) Press Enter.
4) A MS-DOS prompt window will be opened.
 5) Now, locate the “bin” folder of the required application, by using the following commands. For example, let us imagine that there is a project named “ConsoleApplication1” in “D:” drive.
 6) Now, you got the output as
Welcome to C# Console Programming…
All of the previous examples in the material have been given without any arguments to the Main() method.
However, when the program is invoked, you can pass some arguments to the Main() method, if required.
C#’s Main() method receives those arguments in string array format, traditionally called as “args” (of course, C# allows you change the name also).
Syn: Main(string[] args)
Those arguments could be called as “Command line arguments”.
You can use these command line arguments for the internal logic in the application.
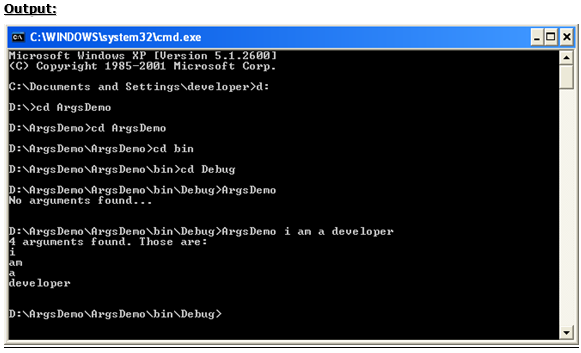
Demo on Main() method arguments
For example, Let us create this application on “D:”
using System;
using System.Collections.Generic;
using System.Linq;
using System.Text;
namespace ArgsDemo
{
class Program
{
static void Main(string[] args)
{
if (args.Length > 0)
{
Console.WriteLine(args.Length + " arguments found. Those are:");
for (int i = 0; i < args.Length; i++)
Console.WriteLine(args[i]);
}
else
Console.WriteLine("No arguments found...");
Console.Read();
}
}
}

As you know already, Main() method is nothing but the entry point of the application.
Most commonly, a .NET application contains only one Main() method.
If needed, you are supposed to define multiple Main() methods also.
But, at run time, only one Main() method can be specified as “Entry Point”. This specification can be changed using the project properties.
To understand better, we start with an example on this.
Demo on Multiple Main() Methods
using System;
using System.Collections.Generic;
using System.Linq;
using System.Text;
namespace MultipleMainMethods
{
class Program
{
static void Main(string[] args)
{
Console.WriteLine("This is the Main() method in Program class.");
Console.Read();
}
}
class MySample
{
static void Main(string[] args)
{
Console.WriteLine("This is the Main() method in MySample class.");
Console.Read();
}
}
}
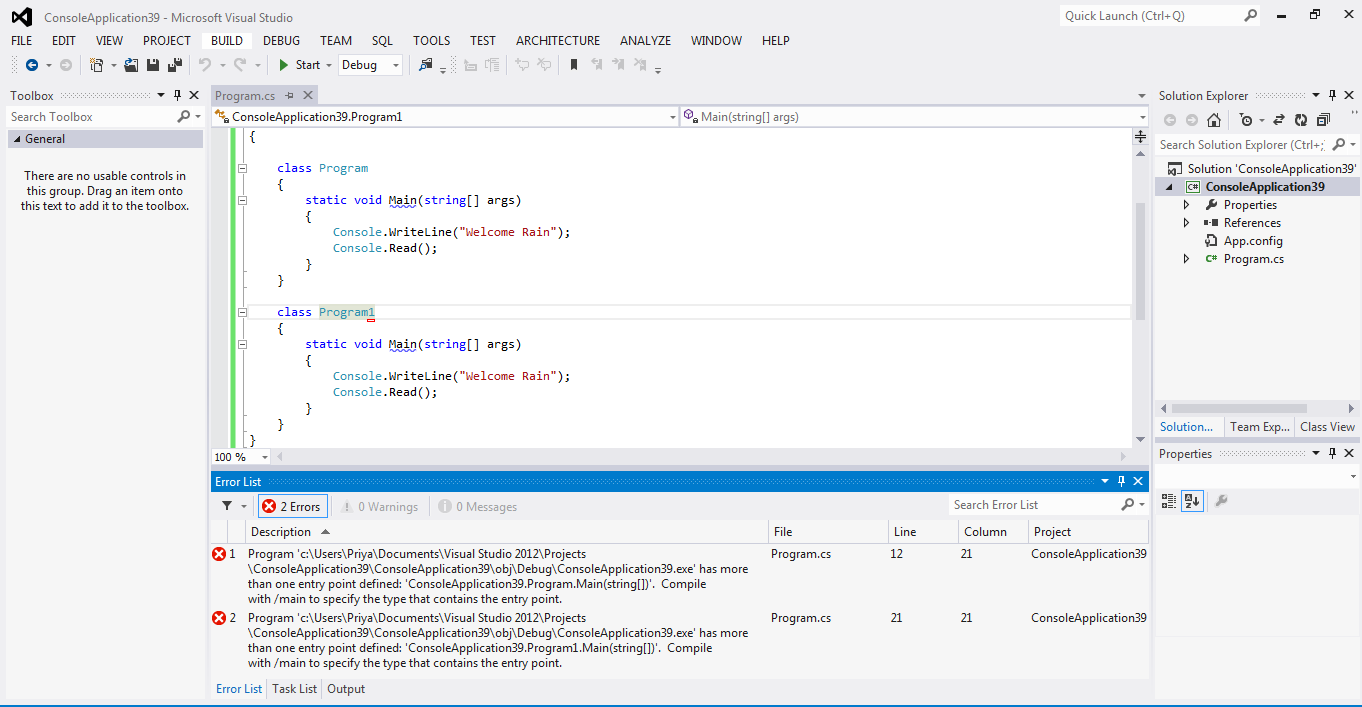
When this program is compiled, the compiler shows 2 compile time errors.
It’s because, two Main() methods are found in MySample class and Program class; So that the compiler can’t understand which Main() method is to be used as exact entry point.
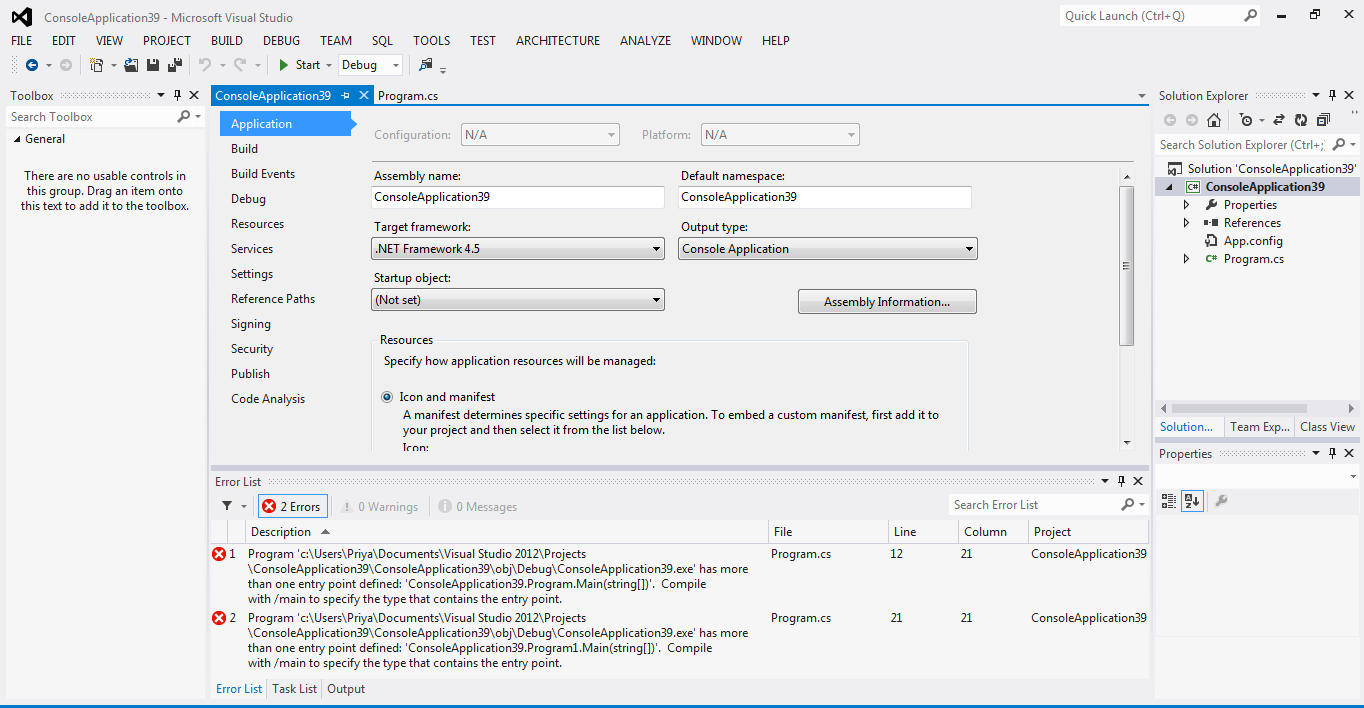
To specify the required entry point, we have to change “Startup Object” option in the project properties.
To open the project properties, click on “Project” menu – “Properties”.
Then the project properties will be opened. Now, observe the “Startup Object” option.
The “Startup Object” option contains two options.
1) (Not Set)
2) MultipleMainMethods.Program
(“MultipleMainMethods” is the project name).
Whenever it is set to “(Not Set)”, C# compiler automatically detects the Main() method, where it is exists. This is the default value in the “Startup object” option. But this fails whenever multiple Main() methods are defined.
Now you have to select the required class that contains the desired Main() method as entry point.

Finally close the properties tab and come to “Program.cs” tab.
Now run the application.
Then you can get the output from the desired Main() method.
Most commonly, a .NET application contains only one Main() method.
If needed, you are supposed to define multiple Main() methods also.
But, at run time, only one Main() method can be specified as “Entry Point”. This specification can be changed using the project properties.
To understand better, we start with an example on this.
Demo on Multiple Main() Methods
using System;
using System.Collections.Generic;
using System.Linq;
using System.Text;
namespace MultipleMainMethods
{
class Program
{
static void Main(string[] args)
{
Console.WriteLine("This is the Main() method in Program class.");
Console.Read();
}
}
class MySample
{
static void Main(string[] args)
{
Console.WriteLine("This is the Main() method in MySample class.");
Console.Read();
}
}
}
When this program is compiled, the compiler shows 2 compile time errors.

It’s because, two Main() methods are found in MySample class and Program class; So that the compiler can’t understand which Main() method is to be used as exact entry point.
To specify the required entry point, we have to change “Startup Object” option in the project properties.
To open the project properties, click on “Project” menu – “Properties”.
Then the project properties will be opened. Now, observe the “Startup Object” option.
The “Startup Object” option contains two options.
1) (Not Set)
2) MultipleMainMethods.Program
(“MultipleMainMethods” is the project name).
Whenever it is set to “(Not Set)”, C# compiler automatically detects the Main() method, where it is exists. This is the default value in the “Startup object” option. But this fails whenever multiple Main() methods are defined.
Now you have to select the required class that contains the desired Main() method as entry point.

Finally close the properties tab and come to “Program.cs” tab.
Now run the application.
Then you can get the output from the desired Main() method.