- C# .NET
- Introduction to .NET Framework
- Applications of .NET, Before .NET
- .NET Advantages, .NET (vs) Java, .NET Framework in-depth
- .NET Framework Architecture, Assemblies and MSIL in-depth
- Run Time Execution Environment, Components of CLR, FCL Architecture
- Getting Started with Visual Studio , Visual Studio IDE
- C# Introduction
- Keywords, I/O Statements, Comments
- Data Types, Variables, Type Casting
- Object class methods, Scope of Variables, Operators, Control Statements
- Enumerations and Arrays
- Main() method in-depth
- Classes and Objects, Creating own classes
- Parameters and Method Overloading
- Properties
- Constructors and Destructors
- Structs
- Partial Classes and Static Classes
- Introduction to Inheritance, Visibility Modifiers and Simple Inheritance
- Hierarchical, Multi-Level and Hybrid Inheritance
- Hiding methods, Method Overriding, Abstract Classes and Methods
- Sealed Classes and Interfaces
- Delegates
- Array Class
- Strings
- DateTime and Random Classes
- Generics
- Collections
- LINQ
- Exceptions
- Debugging, Break points, Immediate window
- Multi Threading
- Multi Threading
- Assemblies
- Assemblies
- Manipulating Drives
- Manipulating Folders
- Manipulating Files and File Streams
- Application Configuration
Assemblies
Def: An assembly is the container of compiled code of .NET applications.
It contains the code in MSIL (Microsoft Intermediate Language) language.
At run time, it will be compiled by CLR’s JIT compiler into machine language.
Types of Assemblies (based on extension):
1. Executable Assemblies / Process Assemblies (with .EXE extension)
Generated with Console Applications and Windows Applications.
2. Library Assemblies (with .DLL extension)
Generated with Class Library Projects.
Types of Assemblies:
1. Private Assemblies
Limited to access with only one application. All of our previous applications come under private assemblies.
2. Shared Assemblies
These are shared by one or more applications. These are implemented for re-usability.
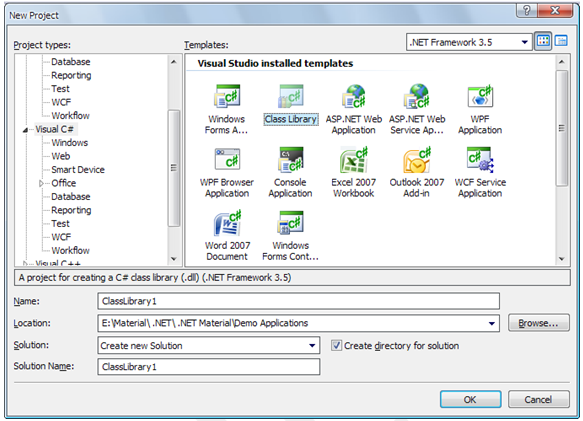
Overview of “Class Library” Project
A “class library” project is meant for the development of “Shared Assemblies”.
The shared assemblies are re-usable in other applications also.
That means the class library’s code is re-usable in other applications, whenever required.
Class library project contains only user-defined classes.
Whenever the class library project is compiled, a library assembly file (with .dll extension) will be generated.
The class library project can’t be executed directly unlike console applications, windows applications etc.
Global Assembly Cache (GAC): All the shared assemblies should be saved in the GAC. GAC offers the following advantages.
Unique identification of the shared assemblies.
Avoid the DLL hell (replacement of an assembly related to one application, by another application).
Faster accessibility.
To view the currently installed assemblies in the GAC, open the following folder.
C:\windows\assembly
Strong Name Keys (SNK): The “strong name key” is a file, that acts as a unique identifier, for the shared assemblies, stored in the GAC.
It contains the code in MSIL (Microsoft Intermediate Language) language.
At run time, it will be compiled by CLR’s JIT compiler into machine language.
Types of Assemblies (based on extension):
1. Executable Assemblies / Process Assemblies (with .EXE extension)
Generated with Console Applications and Windows Applications.
2. Library Assemblies (with .DLL extension)
Generated with Class Library Projects.
Types of Assemblies:
1. Private Assemblies
Limited to access with only one application. All of our previous applications come under private assemblies.
2. Shared Assemblies
These are shared by one or more applications. These are implemented for re-usability.
Overview of “Class Library” Project
A “class library” project is meant for the development of “Shared Assemblies”.
The shared assemblies are re-usable in other applications also.
That means the class library’s code is re-usable in other applications, whenever required.
Class library project contains only user-defined classes.
Whenever the class library project is compiled, a library assembly file (with .dll extension) will be generated.
The class library project can’t be executed directly unlike console applications, windows applications etc.
Global Assembly Cache (GAC): All the shared assemblies should be saved in the GAC. GAC offers the following advantages.
Unique identification of the shared assemblies.
Avoid the DLL hell (replacement of an assembly related to one application, by another application).
Faster accessibility.
To view the currently installed assemblies in the GAC, open the following folder.
C:\windows\assembly
Strong Name Keys (SNK): The “strong name key” is a file, that acts as a unique identifier, for the shared assemblies, stored in the GAC.